Monday, December 01, 2014
Misc: Quick Update
Just a short note on the current pause since I started on the Robotech Tactics models.
I have not gotten any progress since the last posting as there were quite a number of things I need to put my time towards. That and the lack of space to work on for the moment (since the dining table is used by the wife to teach the eldest how to write) had me in a little slump.
Hopefully December will see me pick up the pace since I have plenty coming in from BGG Secret Santa (Descent 2 minis!) and the recent Black Friday Clearance from Wira Games!
My 5th Company is certainly moving forward fast and I should be able to at least complete work on plenty of models, especially at the end of the month after Christmas as I will be on my usual year end leave.
And if, for any reasons I did not get anything up after this post, Merry Christmas and a Happy New Year to all!
Tuesday, November 11, 2014
Robotech Tactics: Valkyrie Fighter Part 2 WIP
Just a pictorial on what happened so far.


 The first VF-1A will be based on the mass production build.
The model have a Mournfang Brown and Ceramite White basecoat over the parts seen above.
I then wash them with Nuln Oil to bring out the grooves and shadows better.
Due to the size, this mini is certainly a tough one to paint. Hopefully they turn out well in the end.
The model have a Mournfang Brown and Ceramite White basecoat over the parts seen above.
I then wash them with Nuln Oil to bring out the grooves and shadows better.
Due to the size, this mini is certainly a tough one to paint. Hopefully they turn out well in the end.
Thursday, November 06, 2014
Robotech Tactics: Valkyrie Fighter
Since Robotech Tactics began shipping, countless international backers are waiting for their products. It sometimes is a downer (for lack of a polite word) if you are not in the US. I could not wait to get my hands my pledge so I did the next best thing, purchase off another backer. A shout out to Josh who was selling his over at the Robotech Tactics group on Facebook. If you are a fan or a backer, I do suggest joining this group as they have plenty of informative stuff you need to know prior to assembling these models, especially if you made loose purchases like me without any guides. https://www.facebook.com/groups/1440349382851175/
Some key things notes from my observation and probably bias comments (based on my experience with Bandai and GW models).
- The models are very small! While there are many size comparison shots take on the group, it did not hit me until I started assembling the Guardian and Battloid mode.
- Details on the models are no doubt very detailed. However, some of the details, in my opinion may be unnecessary, such as the grip of the GU-11 gunpod for the Veritech mode. It is going into the slot if you are assembling it, hence I do not think the details of the handle on it is required. It is like the each parts are modeled separately prior to the final sculpture.
- Assembling can be a pain for the Battloid and Guardian mode especially the arms. The arm assembly for my Guardian mode is a little odd. Probably because of my order of assembly.
- Check out Peter Nolan's image file in the group for exact arm-hand-gun joint combination to use. Very important if you are going 2 handed on the gunpod.
- Veritech Mode: Easy assembly and very straight forward. A little attention need to be given to the tail fins since the tabs and groove for them are very small.
- Guardian Mode: Made a mistake of assembling the body and wings first. Wings, for this mode, should be the last thing to go in. Which probably resulted in the very odd angle of my arms. Some cutting of the stub will be required to put the arms at a better angle in future builds.
- Battloid Mode: Body and torso comes in 3 separate pieces: front, back and lower. This gives the ability for the model to turn. However, I find it a waste that the canopy of the model is a separate piece to assemble. I do not see any reason for that. Legs are joined via ball-socket method. Arms, like the Battloid mode, via stubs.
- GU-11 gunpod alignment. I am not sure of many are having this problem as I do where the hand does not go well with the arm as the fin of the gun is somehow preventing the hands to be pieced correctly. However, I found that the GU-11 on my Guardian have a groove, which I assume is how they intend to GU-11 to rest on the arm as pictured below.
- Tweezers are your best friend here.
- I might just ditch the provided stand. It is too think for my liking, especially for the guardian. A third leg anyone?
- It would have been great if there is a consistency on the sprue design. The sprues I got consist of 7 sprues. 2 each for both Veritech and Guardian Mode. 1 for both Battloids. I will need to wait and see if the expansion will be having 2 separate sprue for each Battloid in the box. (check out the sprues itself in the page link above!)
At the end of the day, I am glad that I got my hands on these. Now to wait for my actual package to arrive in.


Some key things notes from my observation and probably bias comments (based on my experience with Bandai and GW models).
- The models are very small! While there are many size comparison shots take on the group, it did not hit me until I started assembling the Guardian and Battloid mode.
- Details on the models are no doubt very detailed. However, some of the details, in my opinion may be unnecessary, such as the grip of the GU-11 gunpod for the Veritech mode. It is going into the slot if you are assembling it, hence I do not think the details of the handle on it is required. It is like the each parts are modeled separately prior to the final sculpture.
- Assembling can be a pain for the Battloid and Guardian mode especially the arms. The arm assembly for my Guardian mode is a little odd. Probably because of my order of assembly.
- Check out Peter Nolan's image file in the group for exact arm-hand-gun joint combination to use. Very important if you are going 2 handed on the gunpod.
- Veritech Mode: Easy assembly and very straight forward. A little attention need to be given to the tail fins since the tabs and groove for them are very small.
- Guardian Mode: Made a mistake of assembling the body and wings first. Wings, for this mode, should be the last thing to go in. Which probably resulted in the very odd angle of my arms. Some cutting of the stub will be required to put the arms at a better angle in future builds.
- Battloid Mode: Body and torso comes in 3 separate pieces: front, back and lower. This gives the ability for the model to turn. However, I find it a waste that the canopy of the model is a separate piece to assemble. I do not see any reason for that. Legs are joined via ball-socket method. Arms, like the Battloid mode, via stubs.
- GU-11 gunpod alignment. I am not sure of many are having this problem as I do where the hand does not go well with the arm as the fin of the gun is somehow preventing the hands to be pieced correctly. However, I found that the GU-11 on my Guardian have a groove, which I assume is how they intend to GU-11 to rest on the arm as pictured below.
 |
| Arm stub clearly visible. Not sure how deep it should be going in. |
- I might just ditch the provided stand. It is too think for my liking, especially for the guardian. A third leg anyone?
- It would have been great if there is a consistency on the sprue design. The sprues I got consist of 7 sprues. 2 each for both Veritech and Guardian Mode. 1 for both Battloids. I will need to wait and see if the expansion will be having 2 separate sprue for each Battloid in the box. (check out the sprues itself in the page link above!)
At the end of the day, I am glad that I got my hands on these. Now to wait for my actual package to arrive in.
Sunday, October 26, 2014
Warhammer 40K: 5th Company Dreadnought Complete
Completed the Dreadnoughts over last night. They could have been completed much earlier if I can get time aside on the dining table to work on them. It is hard to be able to paint these days unless I am pulling an overnighter like last night. (10 pm to 3 am)


 I added some iconography from whatever I have in my bit boxes to spice the models up instead of leaving them blank. Got the idea to paint the chapter and company logo on the legs from the web while looking out for ideas to make mortis dreadnoughts.
I have also started working on some space hulk models here and there which gave me an idea of adding photos to my paint method page. The first I will be working on will be the librarian and a standard terminator with storm bolter. I will be adding further to the articles as I worked on them.
The Space Hulk models so far.


 I will be focusing on the two models above for the moment to add more contents for my Paint Method page.

 This model was tough to basecoat with the extra cloths flowing around. On the plus side, less to work underneath it.

 I decided to add this in my initial list since it would be fun to paint a dead termie too. I did not have this guy in my earlier Death Angel project.
I have also started working on some space hulk models here and there which gave me an idea of adding photos to my paint method page. The first I will be working on will be the librarian and a standard terminator with storm bolter. I will be adding further to the articles as I worked on them.
The Space Hulk models so far.
Tuesday, October 07, 2014
Warhammer 40K: Dark Talon, Tactical Marines, Company Veterans Complete
Just spent the day getting overdue models done, primarily the Dark Talon.
Dark Talon


 This took me quite a while to decide how to paint some of the key part especially the white of the wings as unit on the box had a blue tinge towards the tips. Tried to emulate that with Guilliman Blue without success. At least now we have one more major unit out of the to do list.
 I will be adding some close ups later. Enjoy the closeups below.


Tactical Marines
 Have not quite decided which squad in the 5th Company they will join. Not even sure if they will be devastator or tactical squad. Perhaps at a later time, the accompanying insignia will be painted.
Company Veterans

 Part of this company will be joining the Command Squad (since the Company Champion is completed). The rest will be assigned to various squad in the 5th Company. Despite having done my roster, I will be assigning them all to specific squads at a later time.
As a preview on the 5th Company roster (1915pt),
- 1st Tactical Squad (1 Plasmagun, 1 Heavy Bolter) (175pt)
- 2nd Tactical Squad (1 Plasmagun, 1 Multi-Melta) (175pt)
- 3rd Tactical Squad (1 Plasmagun, 1 Missile Launcher) (180pt)
- 4th Tactical Squad (1 Plasmagun, 1 Missle Launcher with Flakk Missile) (190pt)
- 5th Tactical Squad (1 Plasmagun, 1 Plasma Cannon) (Dark Vengeance) (180pt)
- 6th Tactical Squad (1 Plasmagun, 1 Lascannon) (185pt)
- 1st Assault Squad (2 Flamer) (190pt)
- 2nd Assaunt Squad (2 Plasma Pistol) (210pt)
- 1st Devastator Squad (1 Heavy Bolter, 1 Missle Launcher, 1 Plasma Cannon, 1 Lascannon) (210pt)
- 2nd Devastator Squad (1 Multi-Melta, 1 Missle Launcher with Flakk Missile, 1 Plasma Cannon, 1 Lascannon) (220pt)
I have yet to decide the exact gear for each of the squad's sergeants. All of them will be veterans for 10 points each.
Dark Talon
Tactical Marines
Company Veterans
As a preview on the 5th Company roster (1915pt),
- 1st Tactical Squad (1 Plasmagun, 1 Heavy Bolter) (175pt)
- 2nd Tactical Squad (1 Plasmagun, 1 Multi-Melta) (175pt)
- 3rd Tactical Squad (1 Plasmagun, 1 Missile Launcher) (180pt)
- 4th Tactical Squad (1 Plasmagun, 1 Missle Launcher with Flakk Missile) (190pt)
- 5th Tactical Squad (1 Plasmagun, 1 Plasma Cannon) (Dark Vengeance) (180pt)
- 6th Tactical Squad (1 Plasmagun, 1 Lascannon) (185pt)
- 1st Assault Squad (2 Flamer) (190pt)
- 2nd Assaunt Squad (2 Plasma Pistol) (210pt)
- 1st Devastator Squad (1 Heavy Bolter, 1 Missle Launcher, 1 Plasma Cannon, 1 Lascannon) (210pt)
- 2nd Devastator Squad (1 Multi-Melta, 1 Missle Launcher with Flakk Missile, 1 Plasma Cannon, 1 Lascannon) (220pt)
I have yet to decide the exact gear for each of the squad's sergeants. All of them will be veterans for 10 points each.
Monday, September 29, 2014
Warhammer 40K: 5th Company Dreadnought
I was not much in the mood to do detailed work over the weekend. I decided instead to basecoat some newly acquired dreadnoughts for the 5th company instead. Something simple that does not really need that much focus and attention.


 Only hours later I realised I forgot to include in Dark Angel icons on the model. Silly me. Probably since I was too busy trying to get the pinning done right as I want a model that is able to swivel, in line with my first venerable dreadnought I built some time ago.
Monday, September 22, 2014
Warhammer 40K+Misc: 5th Company, Tau Commander Arra'Kon and Zong Shi
5th Company
Just a little pictorial post to record the work done so far until now. More units now join the rank of the 5th Company. The devastator squad and scout models are basically the only infantry models I have yet to acquire.
The company veterans are completed except for the single company champion. Since the Veteran Squad is a loose group drawn from the existing companies with no dedicated company assignment for them, I will be integrating them within the various companies itself. Also to note, the existing model for the 9th Company Master is included above as I found another model instead. You can say he is demoted. He will be joining a dedicated command squad instead.
At this point, I realised that I am not exactly consistent in the colour used for the various iconography. I will be adding a page later to keep this in check since it can be a little tiresome to search for the very specific steps.
Commander Arra'Kon


 Model is done. Left the bast to be done. Will be keeping the base colour red in consistent with the existing Mars like desert scheme as done in the previous 2 models. I may just add some grass in as to show it is not all lifeless.
Zong Shi


 From a boardgame I got some time ago via Kickstarter with a friend, I decided to give the models a little life with some colour. The above is the Jade Buddha token used as a start player marker in the game itself. the model is very well detailed, although a little sticky to hold for some reason. Inside the box for too long perhaps. Since the model above is suppose to be jade, I used various colours of green and mostly dry brushing.
 The masters and the apprentices above are painted accordingly to their colour. Although the colours are not exactly the same as the original token, they should be approximate enough to match their corresponding player tokens.
Just a little pictorial post to record the work done so far until now. More units now join the rank of the 5th Company. The devastator squad and scout models are basically the only infantry models I have yet to acquire.
 |
| Company Veterans |
 |
| Tactical Squad. All bolters. Not a legal squad |
 |
| Assault Squad at 50 percent |
Commander Arra'Kon
Zong Shi
- Basecoat with Caliban Green
- Wash with Nuln Oil (I previously washed with Beil-Tan Green. It was not dark enough to my liking)
- Drybrush with Caliban Green
- Drybrush with Kabalite Green
- Drybrush with Warpstone Glow
- Drybrush with Moot Green
- Glaze with Waywatcher Green
- Apply Hardcoat to give it a shine
Wednesday, August 27, 2014
Warhammer 40K: Land Raider Complete
Decided to call it a day with the land raider since I have no further ideas on enhancing this. It is my prototype anyway. My first large model/vehicle.


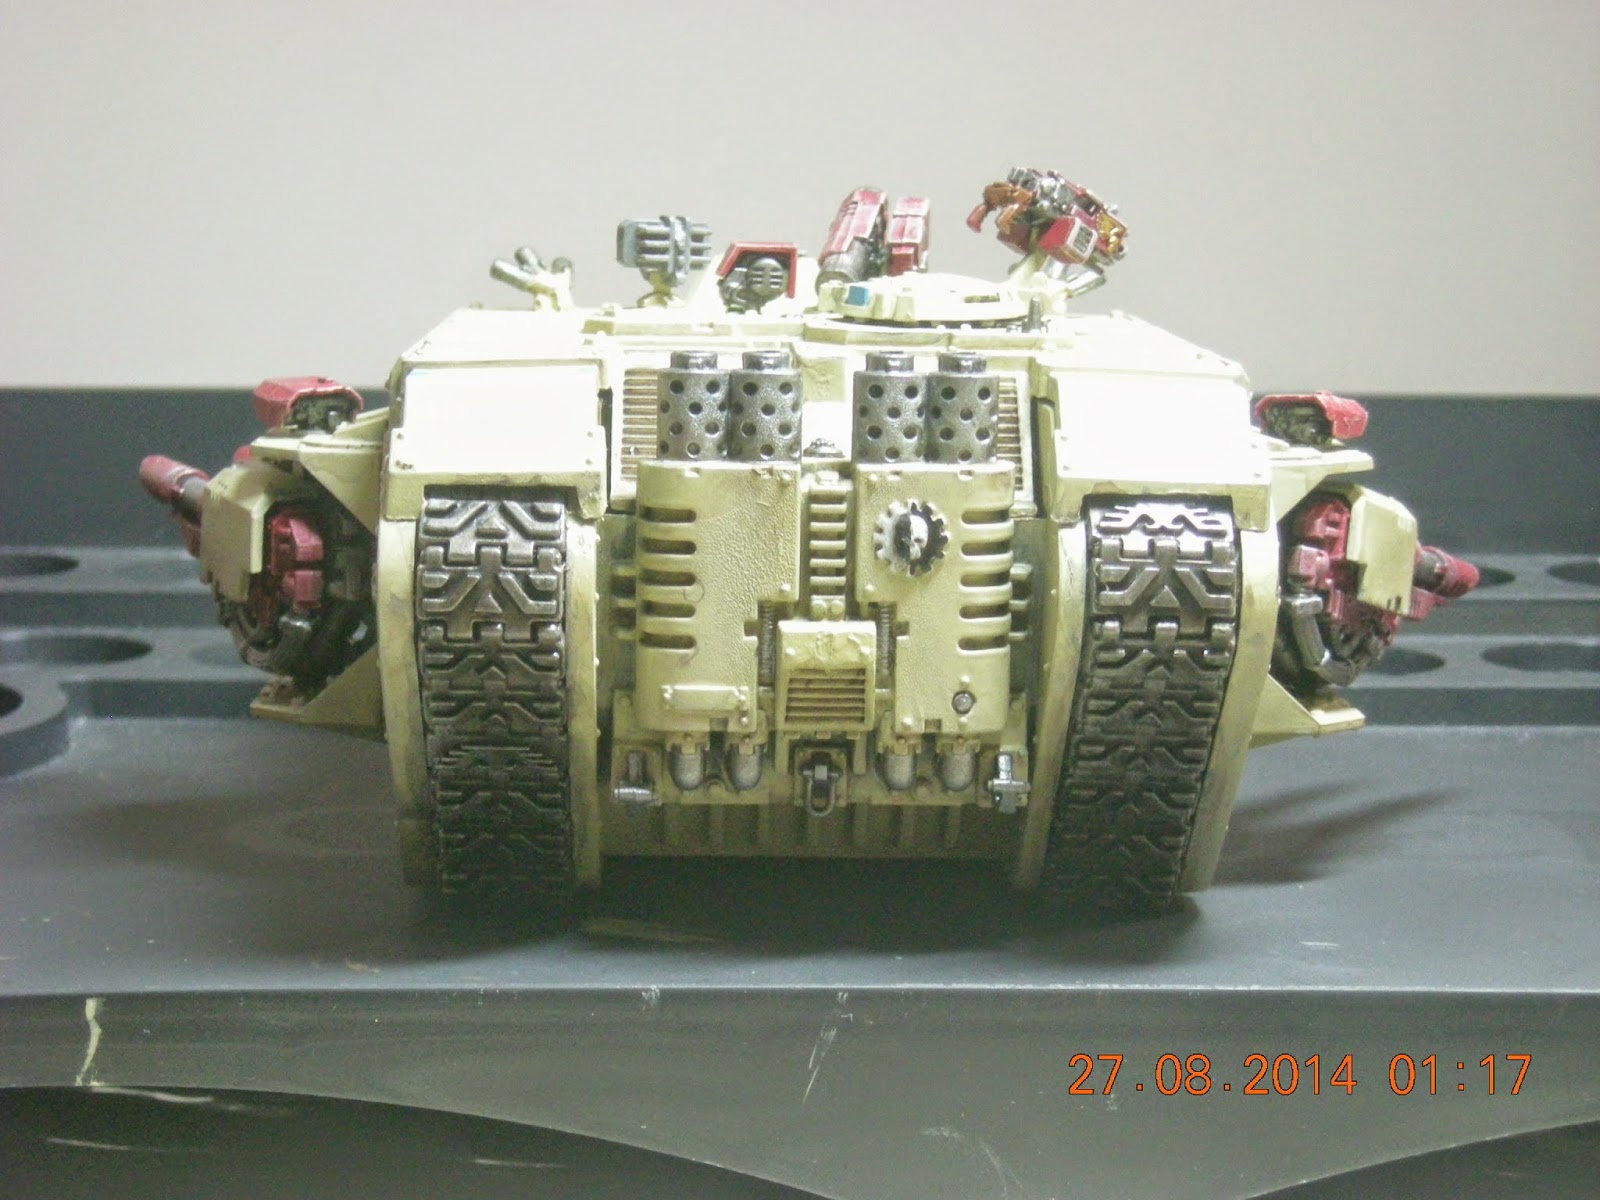
 Most of the parts were drubrushed with Necron Compount do create a dusty look on the model.
Hopefully, the next Land Raider I build (either Redeemer or Crusader) have a better job than this.
Anyway, a sneak peek on what is coming in next.
Most of the parts were drubrushed with Necron Compount do create a dusty look on the model.
Hopefully, the next Land Raider I build (either Redeemer or Crusader) have a better job than this.
Anyway, a sneak peek on what is coming in next.
 Dark Angels Company Veterans. These guys will be populating around every company (at least 2 10 man squad) except for 9th Company Assault since robes are not exactly jet pack friendly.


 Tau Commander Arra'Kon of the Farsight Eight. The legs from the finecast, for some reason, was quite tilted to the back. I decided to give him an action pose of dodging back an attack and moving to retaliate. And yes, I forgot to take a photo of the sprues for my sprue post, which kinda suck since this is from the Tau Commander finecast which is a web exclusive. In my defense, I was actually drooling when I unboxed it. Never expected to see this in the shop.
Subscribe to:
Posts (Atom)