As I mentioned in my earlier post, I'm pimping out my card game with some miniatures.
This post will serve as a checklist on what I have and still need to get.
Base game
Tyranids
Genestealers - (8/24)
Broodlord - (1/1) (Done!)
Terminators (Done!)
Purple Brother Zael - Flamer/Power Fist
Purple Brother Omnio - Storm Bolter/Power Fist
Grey Lexicanium Calistarius - Force Staff/Storm Bolter
Grey Brother Scipio - Storm Bolter/Power Fist
Yellow Brother Claudio - Lightning Claws
Yellow Brother Goriel - Storm Bolter/Power Fist
Orange Brother Leon - Assault Cannon/Power Fist
Orange Brother Valencio - Storm Bolter/Chainfist
Blue Sergeant Lorenzo - Power Sword/Storm Bolter
Blue Brother Deino - Storm Bolter with laser sight/Power Fist
Green Sergeant Gideon - Thunder Hammer/Storm Shield
Green Brother Noctis - Storm Bolter/Power Fist
Taking a peek at the rules of the 3rd edition board game, perhaps I should look around for the game pieces without the minis XD
Mission Pack Expansion
Black Chaplain Raziel - Crozius Arcanum/Storm Bolter
Black Brother Metraen - Storm Bolter/Power Fist
Brown Brother Adron - Cyclone Missile Launcher/Storm Bolter/Power Fist (Done!)
Brown Brother Kaphael - Storm Bolter/Power Fist
DeathWing Expansion
Grey Brother Boreas - Assault Cannon/Chainfist
Grey Librarian Menelauis - Force Staff
Orange Technimarine Hepaestus - Storm Bolter
Orange Brother Raphaen - Storm Bolter/Power Fist
Blue Sergeant Zaltys - Power Sword/Storm Bolter
Blue Brother Jericho - Thunder Hammer/Storm Shield
Yellow Sergeant Arbalan - Lightning Claws
Yellow Brother Gabriel - Storm Bolter/Power Fist
Purple Interrogator-Chaplain Uriel - Storm Bolter/Crozius Arcanum
Purple Brother Charon - Storm Bolter/Chainfist
Green Apothecary Nestor - Storm Bolter/Chainfist
Green Brother Exanimare - Storm Bolter/Power Fist
Tyranids Expansion
Basic Units
Basic Tyranids - Will just replace with the genestealers from the basic set. Either that or use 20 Termagants
Ripper (0/4)
Lictor (0/4)
Hormagaunt (0/4)
Ravener (0/3)
Boss
Deathleaper
Mawloc (Optional)
Trygon (Optional)
Hive Tyrant (Optional)
Thursday, August 29, 2013
Warhammer 40K: Tyranid Termagants Part 4
While preparing for the Genestealers, I had a few termagants painted as a test subject for the possible colour scheme should I decide to start a Tyranid army for W40K. I'll probably go with possibly Hive Fleet Tiamat (Blue/Purple) as they were supposedly the scheme which the genestealers in most of the Space Hulk video games were from.
Unit 1

This unit was painted based on a method I read up in Mini War Gaming's post. The carapace was glazed with Guilliman Blue after layered with Celestra Grey. The glaze does not seem to apply well as seen above. However, it does give an pattern to the carapace of the termagant. Main body is layered with Genestealer Purple.
Unit 2
Same as above with the glaze applied after layering with Macragge Blue instead of Celestra Grey.
Unit 3

This unit suffered from poor priming with Bosny's Flat White which resulted in loss of some facial details. The carapace is layered with Macragge Blue and the edges drybrushed with Calgar Blue. Exposed body parts are layered with Genestealer Purple. Gun is layered with Ushbati Bone and washed with Nuln Oil. This unit, as you will probably noticed, was painted in the same time and scheme with my very first genestealer.
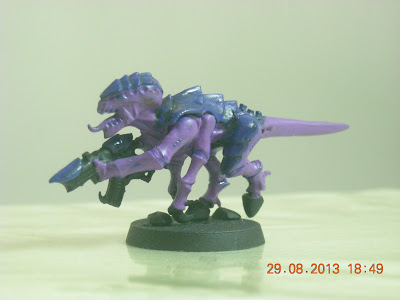
Unit 4

Also another unit disfigured from poor priming. If you have a suggestion on an alternative whites to use other than Citadel's, do let me know. Like unit 4, this unit was painted together with genestealer 2 and 3. Layered with Xereus Purple before being washed with Carroburg Crimson. Carapace is then layered with Macragge Blue and drybrushed with Calgar Blue. Exposed parts are layered with Genestealer Purple. Gun, like before, was layered with Ushbati Bone. Forgot to wash it.

 |
| First Two Prototype |
Unit 1

This unit was painted based on a method I read up in Mini War Gaming's post. The carapace was glazed with Guilliman Blue after layered with Celestra Grey. The glaze does not seem to apply well as seen above. However, it does give an pattern to the carapace of the termagant. Main body is layered with Genestealer Purple.
Unit 2

Same as above with the glaze applied after layering with Macragge Blue instead of Celestra Grey.
Unit 3

This unit suffered from poor priming with Bosny's Flat White which resulted in loss of some facial details. The carapace is layered with Macragge Blue and the edges drybrushed with Calgar Blue. Exposed body parts are layered with Genestealer Purple. Gun is layered with Ushbati Bone and washed with Nuln Oil. This unit, as you will probably noticed, was painted in the same time and scheme with my very first genestealer.
Unit 4


Wednesday, August 28, 2013
Warhammer 40K: Space Hulk Genestealers Part 2
Got some genestealers painted over the last few days.


This first guy was painted using Genestealer as a base, followed by Macragge Blue for the carpace and the skin, as per design in the Space Hulk card game. The spine is the drybrushed with Calgar Blue. I should say that it was a surprised move away from how the termagants were painted as I had always assumed that the arms were the main flesh. Anyhow, the fangs were painted with Ceramite White and Mephiston Red for the tongue. I still need to work more on the toxin sac as I am still not happy with the result. Primarily due to the size and difficult positioning of the sac itself.

I did some changes with the 2nd and 3rd genestealer. For one, I based the unit with Xereus Purple first, followed by a generous wash of Carroburg Crimson. This is to give a base shading over several parts which I could skip painting like the creases in the arm joints and such. I then painted the skin and carapace with Macragge Blue and drybrush the spine with Calgar Blue, just like the first unit. The skin is then painted with Genestealer Purple to give the proper bright colour. At a glance, there isn't much difference between the two methods. The second method does give a better depth in the grooves of the genestealer.
I sure do not want to be caught by these guys charging at me XD

Next Step:
- Scything Genestealers


 |
| Genestealer with extended carapace |

I sure do not want to be caught by these guys charging at me XD

Next Step:
- Scything Genestealers
Warhammer 40K: Space Hulk Genestealers Part 1
Finally, Genestealers! (and 3 pages more than my last blog XD)
 It is a pity that the rear of the box, although cool designs and suggestions, they are using the old paint names. Old stock we have here perhaps?
Anyhow, I finally got myself these bad boys for my Space Hulk Card game (Yes. You read right, card game! The board game is nowhere to be found at an affordable price. Although....)
The contents of this box comes with 8 complete genestealers with assorted add-ons including extra scything talons, toxic glands, some extra heads including feeder tendrils for Ymgarl Genestealers and implant attack for those who wants to recreate Ripley's encounter with the Xenomorphs!

With the contents in the box, I built the following:
- 2 units with 2 pairs scything talons (not sure if this game legal XD)
- 3 units with scything talons and rending claws (again, not sure if is game legal)
- 2 units with a pair of rending claws
- 1 unit with a pair of rending claws and extended carapace (no reference on this in the 5th ed codex)
- all units have toxin sac on each forearms
Next Step:
- Painting

Anyhow, I finally got myself these bad boys for my Space Hulk Card game (Yes. You read right, card game! The board game is nowhere to be found at an affordable price. Although....)
The contents of this box comes with 8 complete genestealers with assorted add-ons including extra scything talons, toxic glands, some extra heads including feeder tendrils for Ymgarl Genestealers and implant attack for those who wants to recreate Ripley's encounter with the Xenomorphs!

With the contents in the box, I built the following:
- 2 units with 2 pairs scything talons (not sure if this game legal XD)
- 3 units with scything talons and rending claws (again, not sure if is game legal)
- 2 units with a pair of rending claws
- 1 unit with a pair of rending claws and extended carapace (no reference on this in the 5th ed codex)
- all units have toxin sac on each forearms
 |
| No whites this time until I can figure it out correctly |
- Painting
Warhammer 40K: Tyranid Termagants Part 3
I have yet to find the right colour paint style for my Blue/Purple colour scheme. Hence I decided to get myself another box of termagants basic set to try out.
While exploring the web, I came across a cool design by another user.
Introducing ServvsUmbrarum's Hive Fleet Defaeco
 His method of primarily drybrushing got me to try it on my own.
 Nowhere as good as his but certainly a very cool way of painting the minis.
Paint Used:
-
Next step:
- More Termagants
While exploring the web, I came across a cool design by another user.
Introducing ServvsUmbrarum's Hive Fleet Defaeco


Paint Used:
-
Next step:
- More Termagants
Warhammer 40K: Tyranid Termagants Part 2
Got the other two completed with the Hive Fleet Behemoth (Blue/Red) and Leviathan(Purple/White) colour scheme.

Hive Fleet Behemoth
- Mephiston Red for the main body with Nuln Oil wash
- Armour plates layered with Abbadon Black followed by wet Macragge Blue for the lining
- Ceramite White for the gun with Nuln Oil wash
Hive Fleet Leviathan
- Ceramite White for the main body with Carroburg Crimson wash
- Armour plates layered with Genestealer Purple then washed with Carroburg Crimson wash then lined with Genestealer Purple
- Mephiston Red for the gun with Nuln Oil wash

I have decided that I made a mistake with the earlier attempt to create Hive Fleet Tiamat (Blue/Purple), so I decided to work with Red/Purple as seen above.
- Genestealer Purple for main body then washed with Guilliman Blue
- Armour plates layered with Mephiston Red then washed with Guilliman Blue
- Ceramite White with Nuln Oil wash for the gun


 |
| Hunting party ready for action! |

 |
| 1st Leviathan. Notice the quality loss on the fangs |

 |
| 2nd Leviathan. Details are retained from good priming |
|
| Fang detail comparison with 1st Leviathan. This is how it should have been |
Nest Step:
- Lacquering
Monday, August 26, 2013
The Hobbit Starter Set Part 2
Finally complete the other two goblins.

In case you are wondering, the 2 right most are the final units I just completed. The left 3 is glossier since I lacquered it with Bosny Clear Coat.

In case you are wondering, the 2 right most are the final units I just completed. The left 3 is glossier since I lacquered it with Bosny Clear Coat.
Warhammer 40K: Tyranid Termagants Part 1

Starting off, I found that not all Termagants are a perfect fit. In fact, the mold is constructed that each halves are to be fit on a 1 to 1 basis. And here I was expecting for possible swap. Probably which is why 2 pieces ended up with glaring gaps when joining each other. This gives me a chance to test out the Liquid Green Stuff which I recently bought. And interestingly, my pot had actually dried up even before opening it!
Thanks to my lazy bones, I tried adding water in an attempt to activate the green stuff (forget the liquid part). The stuff does get dissolved (with plenty of water) and it is then ready to use again. I started with a small amount and found that it does not flow into the recess easily. The best method to use it at this stage, was to use it as a putty replacement (not that I have used putty before). Somehow it works and the mini is ready for priming. Make sure your brush is loaded with water if you are using Dried Green Stuff!
 |
| Dried Green Stuff doing it's work |
The first termagant was a to be a purple/blue scheme based on the original genestealers from Space Hulk. Base layer of Macragge Blue followed by Genestealer Purple on some parts of the carapace based on painting technique (http://thetyranidhive.proboards.com/thread/38555). It is a very interesting technique which is not easy to pull on a smaller unit like the termagants, but possible.


In the mean time, I had a little accident with my 2 repaired termagants where the spray from the Bosny White spray turns out to be a little too thick for the model that the details of the teeth disappeared. I attempted to use nail polish remover (acetone) to remove whatever excess build up from the spray.


Nest Step:
- 2 remaining Termagants
Wednesday, August 07, 2013
Warhammer 40K Paint Set Part 2

The other method I tested was painting yellow by layering Lamenters Yellow over white surface. This certainly gives an interesting result as seen in Blue team with the grey base below. I ended up using this method, followed by a Nuln Oil wash, to paint all the emblems including the purity seals.

 |
| Shoulder pads were lined with Abbadon Black |

Next Step:
- Faction insignia of the new units. Not sure if I can try stenciling it.
Monday, August 05, 2013
Doom Miniatures Part 12: Cyberdemon
 |
| Doom 3 Cyberdemon |
 |
| Doom 2 Cyberdemon |
 |
| Split apart for an easy time painting |
The skin is the washed with Nuln Oil to darken the pits and creases. The skin is then layered with Steel Legion Drab and highlights were done with Ratskin Flesh. The eyes were dotted with Mephiston Red and then the entire metallic parts were glazed according to their faction. Once the paint job is completed, both top and bottom are finally glued together.

 |
| It's about damn time! |
Paint Used:
- Mournfang Brown
- Leadbelcher
- Steel Legion Drab
- Ratskin Flesh
- Mephiston Red
- Nuln Oil
Next Step:
- Lacquering
Subscribe to:
Posts (Atom)